Hey friends! SO excited about today’s post because I’m sharing a project that I’ve been wanting to do since we moved in seven years ago. My sweet husband surprised me on my birthday last month and started demoing my old backsplash. He knew I’ve been dying to replace it and it really was the best birthday present. Well, it’s all finished, and I can’t wait to share with you the process of how we knocked out our old backsplash and did a subway tile backsplash DIY in the kitchen. I’ll also be sharing tips for beginners that will help you on your tiling project especially if your new to tiling like we were. Let me first remind you what my old backsplash looked like.
Backsplash Before

This stone backsplash was here when we moved in and it is really pretty but not so much my style. I had thought about painting it white but just never got around to it. One solution I had was to cover it with a black and white patterned faux backsplash, which I actually loved. After having that up for about a year, it was time to put in the real thing.
Materials

Here are the links of what you’ll need to get started on this project:
- Wet Saw and/or Manual Cutter (we used both)
- Grout Float
- Trowel
- Sharpie
I’m going to break this project down into 3 sections — demo, installing the tile, and grouting. You may or may not have to demo like we did depending on if you have an existing backsplash.
Demo & Drywall Replacement
If you have an existing backsplash, then hopefully this section will help you with demo and drywall replacement. If not, skip ahead to applying the tile. I’ve seen plenty of DIYs out there where they are able to salvage the existing drywall, but we were not able to reproduce this ninja-like feat. When we pulled off our first few tiles, the sheetrock underneath was wrecked. So, we decided just replace we would have to replace it. This is very common when demoing an existing backsplash. Here are the materials you’ll need to demo the space and hang new drywall:
- Hammer
- Crowbar/pry bar
- Box Cutter
- Sheetrock (however many pieces you need for your space)
- Drywall Screws
- Drywall Knife or Multi-Tool
Demoing the Existing Backsplash

This part was a lot of fun but a huge mess! My first tip when demoing your old backsplash is to be prepared for the mess. Put down a plastic drop cloth on your countertops to protect them and help with the clean up. As you can see, we didn’t do this at first, so it made cleaning up a lot harder. Also, make sure you have lots of trash bags or even boxes to dispose of materials.
Like I said, we tried a pry bar at first but it was doing too much damage to the existing sheetrock, so we knew we were going to have to take the wall down to the studs. So, we just grabbed a couple hammers and started banging away at the tiles. They were stuck so well to the drywall that most of the drywall came down with the tiles. We pulled off the remaining sheetrock and cleaned up the drywall around the cabinets with a box cutter and drywall knife so that we would have clean lines for the new sheetrock.
Adding New Drywall For Your Backsplash

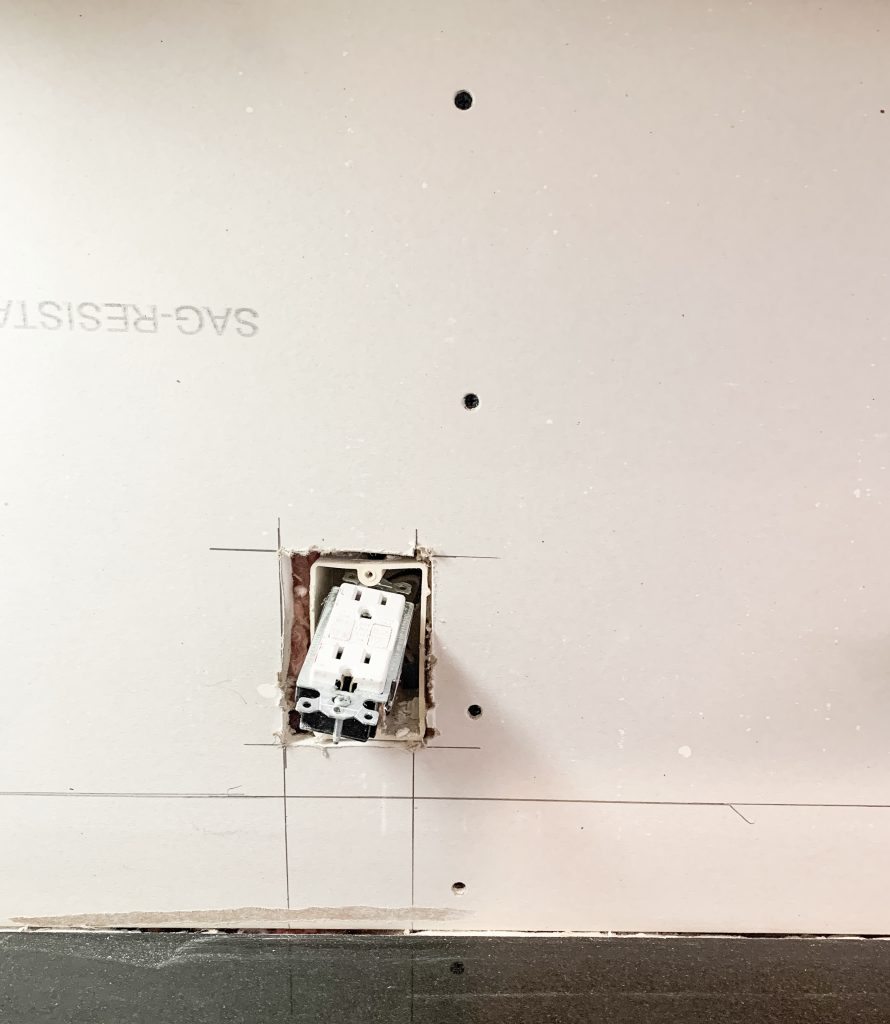
The fist step is to measure out your space that will need new drywall. At first we were intimidated by this step because we haven’t done a lot of drywall work aside from patching up a hole here and there. But, if we can do it, then you can do it. It only took about 1 and half sheets of drywall. Simply measure the height (standard distance from countertop to cabinets is 18″) and width of your space. Cutting the large pieces of drywall is easy. You just score them with a box cutter and then break off the piece. Then, just measure for your outlets. We used a multi-tool to cut out the holes for the outlet which simplified this part by a lot. Finally, just fit your new drywall into your space like puzzle pieces and screw it into place with drywall screws. The best part is you don’t have to tape or mud drywall since we’re just putting our new tile directly on top of the sheetrock. So, now we’re ready to start tiling.
Installing the Subway Tile
Now it’s time for the fun part of this subway tile backsplash DIY — actually applying the tile to the wall. We chose the 12 inch subway tiles, but all of these steps would work the same for the 6 inch tiles. The first, and most important step, is ensuring that the bottom row is level. Nobody wants crooked tiles. We drew a line on the wall to help guide us but you can use a laser level or regular level to help keep it straight along the way.

Then, just start applying mortar using your trowel to either the wall or each tile and set the tile applying spaces between each tile. We preferred putting the mortar directly on the tiles because it was way less messy. There was no mortar dripping down to the countertops using this method. Once you have the bottom row set and level, the rest is just like putting together puzzle pieces. On the second row of a subway tile install you want to apply it at a 50% offset. So, for the bottom row start with a full tile. Then, on the second row you’ll use a tile you’ve cut in half to start the row and alternate each row of tile. This part is pretty simple…until you have to start making cuts around the outlets.
Here’s a quick video of us installing the first couple rows


Cutting the Tiles
Cutting Subway Tile Around Outlets
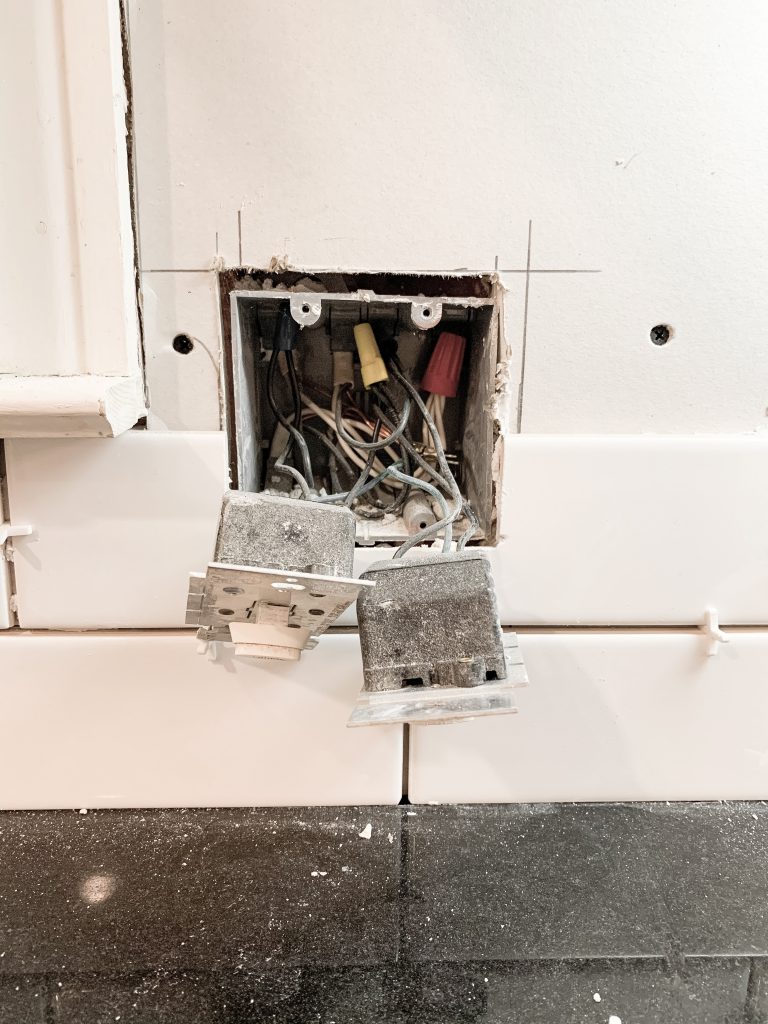
This was the probably the most difficult part of the job. For cutting our tiles we used both a wet saw (we bought one for $100 but they are inexpensive to rent) and a manually cutter. First, make sure your measurements are right when cutting around outlets. So, you’ll want to hold up the tile you want to cut with spacers keeping it apart from the tiles around it. Using a Sharpie, mark where you want to make your cuts (don’t worry it wipes right off). Mark vertical cuts first. Then, move the tile to the side of the outlet to market for your horizontal cut. Pay special attention to the top and bottom here. You want to leave space for your screws to be able to go back into the boxes and so that the prongs on the outlets rest against the tiles.
Once you have the tile marked, it’s time to make the cut. Around outlets, you’ll typically have to make 2 vertical cuts in the tile and 1 horizontal cut to cut out the rectangle space. The vertical cuts were easy. Just line up your wet saw and go. But making the horizontal cut to complete the square was the most frustrating part of the entire job. We tried using manual cutters, tile nippers, etc. but we broke a ton of tiles trying to do this. What ended up working best for this was using a multi-tool and a certain type of blade for tiles. Once we figured this out it made our life 10 times easier when it came to making cuts.
Making Other Tile Cuts
There were two other common cuts we made to the tiles — cutting them in half and ripping a small slice off the top for the last row. For both of these we used a manual cutter because sometimes the wet saw would make the very end of tile jagged. These were very easy using the manual cutter. Pro tip for this part is it doesn’t take a lot of pressure using the manual cutter. Barely score the tile and then use the breaker bar on the cutter to break it.
Tiling Corners

Tiling the corners was pretty simple for the subway tile backsplash DIY. You just need to decide whether you want to make your tiles flush (all the way up against the other wall). Or leave a gap like we did and fill it in with grout to give it a look consistent with your other tile spaces. Either way looks great!
Finishing Edges on Subway Tile

There are lots of great options for tile edging trim now. We chose this PVC version of the trim because I LOVE WHITE. Shocker, I know. No, but when you get to this part just make your measurements then cut trim edge pieces at a 45 degree angle and use thin-set mortar to stick them to the wall. Then, cut your last column of tiles up to the edge of the trim.
Grouting the Backsplash

With all the excitement of this project almost being finished, I somehow forgot to take pictures of the grouting process. So sorry about that, but hopefully I can walk you through this step. Grouting is pretty simple. Apply a good amount of grout to your grout float and work in an “X” pattern keeping your float at a 45 degree angle to work the grout in the spaces between the tiles. Then use the float at 90 degree angle to wipe the excess grout off the front of the tiles. Work in small spaces letting no more than 5 minutes go by without using your grout sponge to wipe the tiles clean. For using the sponge, just wet your sponge and wring it out as much as you can and wipe the tiles clean until there is no haze on the front of the tile. Then, repeat this process until your entire space is grouted.
We chose a white grout which was a good choice for a beginner because it doesn’t show as much if your grout lines aren’t perfect. We knew ours wouldn’t be because this is our first tiling project. But, we love the look of black or grey grout with subway tiles but we went with the safe option because we knew our lines wouldn’t be perfect.
Subway Tile Backsplash Reveal
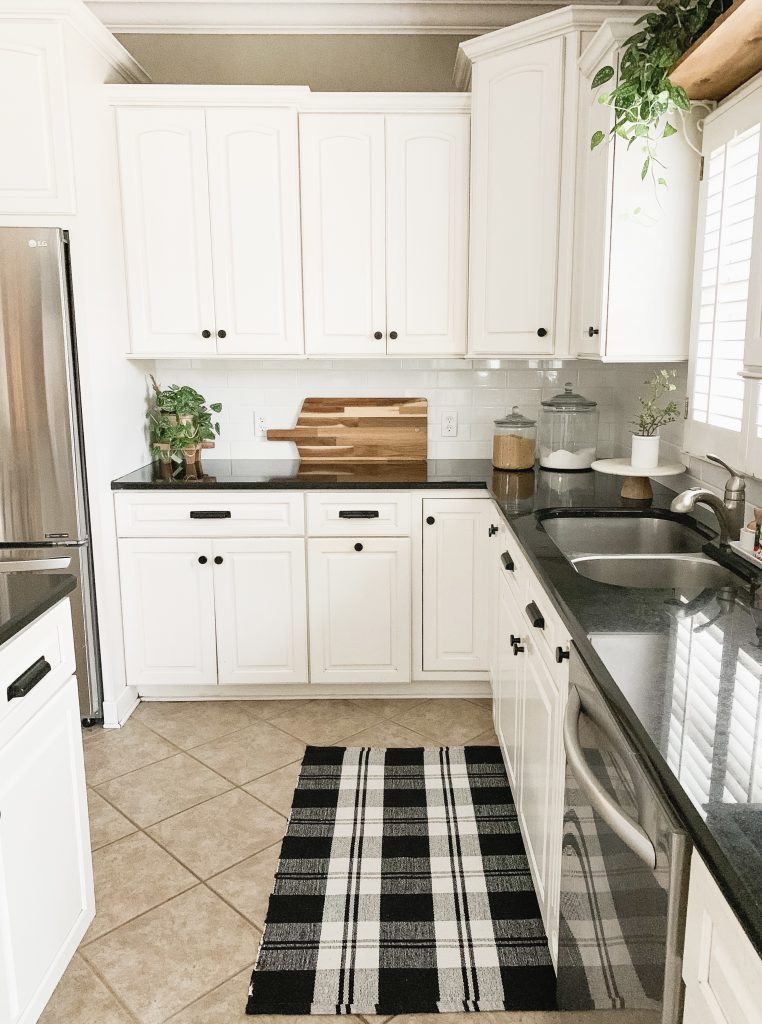

And this is the finished product of my subway tile backsplash DIY. I just love how the new kitchen look is so light and bright! I know what you are thinking, why choose a white subway tile when I already had white cabinets. Well, let me tell you a few reasons why subway tile is a great choice for your backsplash.
Why Choose Subway Tile?
- Subway tile is classic. With all the trends that come and go so fast, subway tile will help keep your kitchen classic and beautiful.
- Inexpensive DIY with a high end look. This project cost in total around $250 including the tiles. If you were going to hire out this project, it would cost you around $2,000-$3,000.
- Subway tile looks beautiful with almost every style kitchen. Whether you have a modern, farmhouse, classic, or eclectic style kitchen, subway tile will be a beautiful choice.


So, let’s take one more look of the before and after of this project. I just can’t get over how much lighter and brighter it looks and feels now! Just slide the bar to see what it looked like before vs. how it looks now. Don’t forget to notice my new black knobs and pulls. I’ll be sharing all the details on those soon!


So, I hope you enjoyed seeing how this process came together. We had so much fun on this project, and I couldn’t be happier with how it turned out. My hope is that this subway tile backsplash DIY tutorial will help you when you are ready to tackle your tile project. Good luck, and I can’t wait to hear all about! Thanks so much for stopping by today!
Shop This Post
Pin For Later






Carissa, my kitchen floor is similar to yours as well as the layout. I have been wanting to do the white subway tile with the white grout. Like you I have white cabinets. I absolutely love how it came out! Exactly how I pictured my kitchen. I can see how your style is changing as you are going with cleaner lines. Love the changes and thank you for the inspiration. Of course I will be doing this project in my kitchen as well. Thank you for sharing!
Hey Sherry! Your comment made my day. So happy you enjoyed the post and like how it turned out. Good luck with your project. I can’t wait to hear how it turns out!