Banners are a fun way to add a touch of style and personality to any space. My son had a little corner in his room that I wanted to transform from a reading corner to a desk area. He is 6 and loves to draw, so I knew he would get more use out of a desk. I began thinking of what artwork would make this space fun. Since his room already had a Swiss Cross rug in it, I thought it would be fun to bring that pattern up to his walls. Today, I will share my step-by-step guide to making a DIY Swiss Cross banner and share with you his little boy desk area reveal.
Swiss Cross Banner Materials

To begin, you only need a few minimal materials to create your DIY Swiss Cross banner. I picked up some vintage-inspired khaki fabric from Hobby Lobby. Then, I decided what size frame I wanted to make. I went with this matted frame from Target. You will also need a stencil. I decided to make my Swiss Cross since I didn’t have one. After I measured how large it needed to be, I got a measuring tape and measured out each side to make sure it was even. My Swiss Cross measured 8 1/2″ x 8 1/2″. Now, I was ready to apply my stencil to the fabric.
Step 1-Apply Stencil To Fabric

After cutting your fabric to the desired size, I centered up my stencil and began taping it down with painter’s tape. You can skip this step if you have a stencil.
Step 2- Fray Fabric Edges

I wanted my banner to look like a vintage piece of art so I decided to fray the edges. I began by pulling some strands out. Next, I used scissors to run across the sides to fray the edges even more. This will help give your fabric an authentic look.
Step 3- Paint Your Design


You will need your desired paint color. I used black paint that I had laying around. I dabbed the paint on there giving it an imperfect look. This helped add a vintage look that I was going for.
Step 4-Paint Your Frame (optional)
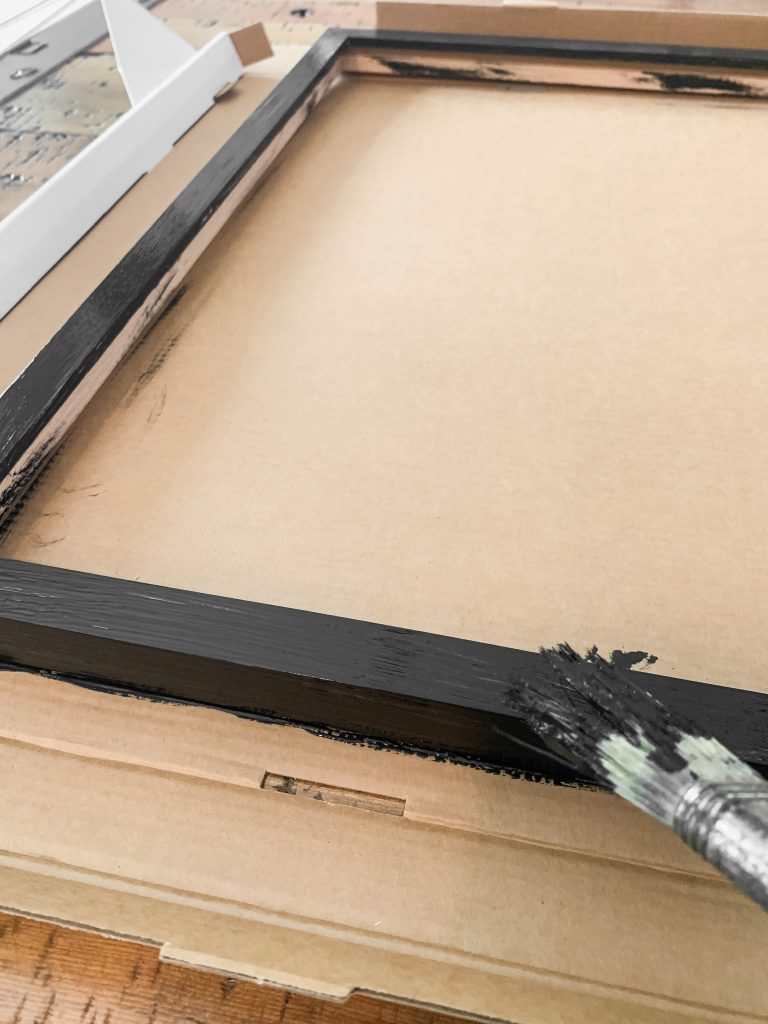
I found a frame that I loved but it was the wrong color. Hey, nothing a little black paint couldn’t fix. I painted the frame to match his room. The last step is to tape your fabric onto the mat before framing it to secure it from moving.
Swiss Cross Banner Wall Art Reveal

Here is how my DIY Swiss Cross banner turned out!! I love how it looks in his room and the best part is that it only cost me around $30 to make. Its simplicity, versatility, and timeless charm make it the perfect addition to a little boy’s room.


Desk Area Details

I found this grey desk for $50 at a second hand store and knew it would blend in perfectly with his big boy room. I knew I wanted the artwork to be fairly large and go above his desk. The clean lines and minimalistic appeal of this Swiss Cross artwork provides a calming effect, creating a peaceful and soothing atmosphere for his room.


I added a black industrial lamp, a small plant, and a diffuser light to act as a nightlight at night. I added a simple desk chair from Target to finish off his desk area corner.


Since he loves to draw, I filled a metal organizer with crayons and markers so he has everything he needs to create fun pieces of art. I’m so happy I was able to create a workspace for my son to enjoy. He absolutely loves it and the best part is that I made a piece of artwork that has timeless charm that he will be able to grow with.
Shop This Post
Pin For Later




Leave a Reply